How to Replace a Manual Chain Hoist Hook – A Step-by-Step Guide
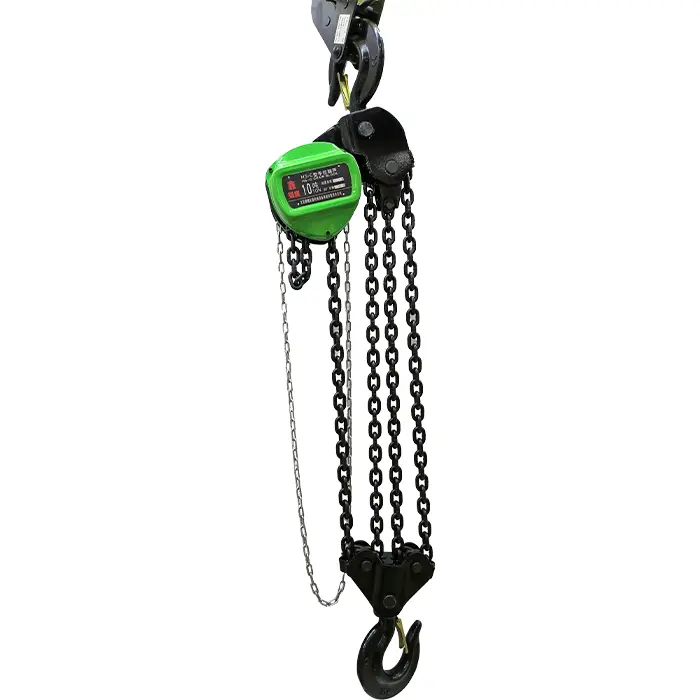
Manual chain hoists are widely used across construction, manufacturing, and logistics due to their compact size, ease of operation, and reliable lifting performance. However, like any mechanical equipment, they can experience wear and damage over time — one of the most common issues being hook failure or deformation .
If you're faced with a damaged hook and cannot immediately send your hoist for professional repair, it’s possible to replace the hook yourself — provided you follow the correct procedures and take all necessary precautions.
In this guide, we’ll walk you through the step-by-step process of replacing a hand chain hoist hook , including what tools you'll need, how to ensure safety during the replacement, and why choosing the right replacement parts matters.
Why Replacing a Hoist Hook Might Be Necessary
The hook is one of the most critical components in a hoist system. It directly bears the weight of the load and must be strong, durable, and free from defects. Over time, hooks can become worn, bent, cracked, or corroded — making them unsafe for continued use.
Regular inspection and timely replacement of a damaged hook can prevent serious accidents and extend the overall life of your hoist.
Safety First: Preparing for the Replacement
Before starting any maintenance work, it's essential to create a safe working environment:
Choose a flat, clean, and stable surface to place the hoist.
Ensure the area is free of debris and moisture to avoid contamination or secondary damage.
Disconnect the hoist from any load and secure it properly to prevent accidental movement.
⚠️ Important Note: If you are not familiar with the internal structure of the hoist or lack technical knowledge, it is strongly advised to seek assistance from a qualified technician . Attempting repairs without proper training can lead to equipment damage or personal injury.
Step 1: Select the Correct Replacement Hook
Choosing the correct replacement hook is crucial to maintaining the hoist’s lifting capacity and safety standards.
Match the model and specifications of the original hook exactly.
Confirm the load rating and material type (e.g., forged steel) to ensure compatibility.
Use only manufacturer-approved or certified parts to maintain compliance and reliability.
Using an incorrect or substandard hook can compromise the entire lifting system and pose serious safety risks.
Step 2: Disassemble the Old Hook
With the hoist secured and the area prepared, carefully begin the disassembly process:
Locate the hook attachment point — usually connected via a pin or bolt.
Remove the securing fastener using appropriate tools such as a wrench or screwdriver.
Gently detach the old hook from the chain or housing unit.
During this step, pay attention to any additional components like retaining clips or washers that may also need removal or reinstallation.
Step 3: Clean and Lubricate Connection Points
Before installing the new hook, take time to:
Clean the connection area , removing dirt, rust, or old lubricant.
Apply a thin layer of high-quality lubricant to reduce friction and wear between moving parts.
This simple step helps improve the hoist’s efficiency and prolongs the life of both the hook and surrounding components.
Step 4: Install the New Hook
Once everything is cleaned and prepped:
Attach the new hook using the original fasteners or new ones if required.
Ensure the hook is securely tightened and aligned properly.
Double-check that the hook opens and closes smoothly without binding.
Tighten bolts or pins to the manufacturer’s recommended torque specifications, if available.
Step 5: Perform a Full System Check
After replacing the hook, conduct a complete inspection of the hoist before returning it to service:
Test the chain movement for smooth operation.
Inspect the housing and cover for signs of wear or damage.
Ensure all bolts, pins, and connections are tight and secure.
If everything looks good and functions properly, the hoist is ready to be put back into use.

Replacing a manual chain hoist hook may seem straightforward, but it requires careful planning, the right tools, and a clear understanding of safety protocols. While experienced users may feel confident performing the task themselves, most individuals should consider professional support to ensure the job is done correctly and safely.
By following these steps and prioritizing quality replacement parts, you can maintain the integrity of your hoisting equipment and continue operating with confidence and efficiency.